Looking for some help to maximise your time and effort on your blog? Whether you’re an established creator going through a bit of a rut, or a brand new blogger needing some tips to avoid getting overwhelmed, I’ve got lots of helpful blog workflow ideas to keep you organised and make sure you’re reaching your potential.
Confession: I’m an absolute nerd for productivity. I make spreadsheets for fun, I have tried out almost every project management tool on the internet, and I rely on my ‘second brain’ (my online system) for everything from appointment times, meal ideas, categorising my travel photos, managing my social media channels and more. As I said, nerd!

I totally understand that not everyone, in fact probably almost no one, is like me. Having a blog can be overwhelming, especially if you’re also juggling full-time work, social and family commitments, travel and so on. It’s a common occurrence for new bloggers to try this out as a side hustle, but to get discouraged when they start to see all the work that goes into it.
It’s taken me a couple of years of working on my blog, including the past year as a full-time content creator, to really knuckle down a travel blog workflow that is both efficient and effective.
Everyone’s blog, photography or creative workflow will be different because it needs to fit the way you think, but this guide will explain why you need a blog workflow, my exact workflow for blogging and content creation, how to create your own blog workflow and the best tools and gadgets I’ve found to help you stay organised.

Why do you need a blog workflow?
Contrary to some people’s beliefs, having a blog doesn’t mean writing a couple of pages and pressing publish.
Depending on your niche, the work that goes into the back end of content creation is major. Travel bloggers obviously have to travel (some travel full-time, like me!), mum bloggers are raising children, fashion bloggers might be attending shows and launches, and food bloggers spend hours making their own dishes to share.
On top of that, you’ve got to build a brand, do SEO research, gather information, try products and services, take or source photos, manage social media, network, promote your posts, and build an email list. Then after all that’s done, you need to find ways to make money off it! That might mean outreach to potential partners, adding affiliate links or selling advertising on your website.
If you tackle each of these tasks in a different order or a different way for each blog, you’ll be wasting so much time!
Not only will you have to stop and think after every single task to try and remember what to do next, you’re much more likely to miss important steps or make mistakes if you’re winging it every time.
Having a workflow set up for each blog you publish can save time (and brainpower!), and help you maximise the success of your blog.

My exact travel blog workflow
Explaining a workflow process can be confusing because the terminology isn’t super clear.
So just to make it easy to understand, I’m going to split my workflow into three key areas: capturing content (travelling, taking photos, doing the things I’ll be writing about), publishing (keyword research, writing, editing, everything that can happen once I’m sitting at a desk on my laptop) and promoting (what I do after a blog has been published to get it seen by more people).

Step one: Capture the content
This one will totally depend on the type of content you create. If you’re a lifestyle blogger, this part might be quick and easy because you’re writing about the things that happen in your normal day-to-day life. For a travel blogger (like me) this is often the most time-consuming part, and might include planning a trip, exploring a new destination, staying at a hotel, doing an activity, etc.
The most important thing to remember for this step is to capture enough to use when you’re in the publishing stage. This could mean photos or videos, or just to take enough notes (mentally, electronically or on paper) to refer back to when you are writing.
I generally take both photos and videos, in both portrait and landscape orientation, on my camera and on my phone. I know that seems like a lot, but for me it’s necessary!
Photos are great for all channels but videos perform well on Instagram Stories and Tiktok, and might be useful down the line if I decide to focus more on YouTube or other video platforms. Portrait is best for Instagram because it takes up more of someone’s phone screen and is more likely to grab their attention, but I find a mix of landscape and portrait is important for blogs. And I always use phone photos to share on my Stories, but prefer to have the higher quality raw camera photos for other channels.
Don’t forget to back up your photos online (I use Google Photos) and on an external hard drive, just to be safe.

Step two: Do SEO research
Before you begin typing, you need to do some SEO research to plan your basic blog outline.
SEO research is essential to your blog workflow, because without it, your reach will be completely dependent on how you promote it on social media and other channels. With a good SEO strategy, your blog will make its way up Google’s ranks and with any luck you’ll be able to reach hundreds or thousands of people a day.
There’s a number of SEO tools out there, but my top pick is Keysearch. Keysearch is the most affordable and easy-to-use SEO platform that I’ve tried personally, so it’s unsurprising that it’s a popular choice for many bloggers. At only $17USD per month, or $169 annually, it’s a reasonably small investment compared to other SEO sites like Ahrefs or SEMRush (both $99 a month, ouch!). KWFinder is another budget-friendly option, at $30USD per month.
With Keysearch, you can find out search volumes and difficulty scores of different words you want to rank for, track your SERP (search engine results page) rankings, analyse your competitor’s keywords and more. I’m on the Starter monthly plan which gives me 200 daily searches, but if you’re doing SEO for a business you might need the Pro monthly plan which gives you 500 searches.
BONUS DEAL: Sign up to Keysearch with the promocode KSDISC and you’ll save 20% each month!
To make sure you’re writing a blog that is likely to rank, use Keysearch to find keywords with a low difficulty score and decent search volume. Your potential to rank will depend a lot on your topic, the strength of your website’s Google profile (how many backlinks you have, your expertise on the subject etc.) and how informative and Google-friendly your blog is, so it’s impossible to give you exact numbers to aim for.
If you’re keen to take your SEO skills to the next level, head on over to Make Traffic Happen where Gemma and Laura dive deep into SEO strategy with their ‘SEO the Easy Way’ course and eBook.

Step three: Plan blog outline
Now that you’ve got the keywords you’re aiming to rank for, it’s time to plan your blog.
Is it a review, a listicle, a thorough destination guide or something different? Figure out the question you’re answering or the problem you’re solving. Is it telling people things to do in Hungary, or the best gifts for new mums, or a comparison of two different cameras? Understand why you’re writing the blog first, and then it’s much easier to plan the layout of the article.
I try to plan my headers before I begin writing but that might not work for everyone. It might take you a bit of trial and error to learn whether you prefer to have a detailed blog plan first or if you like writing off the cuff and set it out into headers later.
Be sure to include your keywords in the first paragraph and sprinkle them throughout your headers and paragraphs, but only use them in places that make sense and don’t stuff them in every second sentence. You want Google to be able to read your blog and understand what you’re talking about, but don’t forget first and foremost you’re writing for humans!

Step four: Write!
I think this is the easiest bit! Sit down at your computer, your tablet or your desk with a pen and paper, and start bringing your blog to life.
My personal preference is to type up blogs on my laptop on WordPress, but many people write their blogs in Word, Google Docs or another online programme before transferring it into WordPress. Either way, make sure you’ve got a decent spellcheck like Grammarly (free) to avoid any spelling or grammatical errors.
Step five: Get the blog ready for publishing
Now step four and five might be a bit intertwined depending on your workflow preferences.
To get a blog to the stage where it’s ready to publish, it’s essential that it’s laid out correctly with optimised headers and sections, include relevant external and internal links, include photos and have an SEO-friendly meta description.
On top of that, you might also need an affiliate or sponsorship disclaimer, a table of contents, a call-to-action encouraging a comment or purchase, a social plugin for easy social sharing, Pinterest pins, and a featured snippet if your blog theme requires one.
My exact blog workflow for this step looks like this:
- Write the blog
- Write a CTA that encourages comments
- Add relevant internal links
- Add relevant external links and affiliate links
- Add a ‘read more’ section to similar blogs
- Add photos (I normally use my own but you can find free stock photos on Unsplash)
- Add Pinterest pins
- Add affiliate, sponsored or PR buttons/disclaimers if necessary
- Add meta description
- Add feature text (my blog theme pulls this onto the blog homepage)
- Double check keywords + spelling + grammar
- Publish or schedule the blog!
Step six: Build links
Once a blog is live, I start thinking about how I can build the post’s link profile.
I’ll go through old related blogs and add a link to the new blog, and I’ll look for opportunities for guest posts or collaboration posts on link building Facebook groups (like this one) to give it some Google love.
The last step is to share the blog across my own social channels. I normally add the Pinterest pins to my Tailwind schedule and Tailwind Tribes, do a ‘swipe up’ Instagram Story, share it on my Facebook page and might do a LinkedIn post.

How to create a blog workflow
Go through your existing blog process from start to finish
To figure out how you can make your workflow better, you first need to complete the entire process start to finish to know what you’re working with.
Begin with thinking of an idea for a blog, and note down every single step it takes you to reach the stage of publishing and promoting it. Be sure to include specific tools you use, like a keyword research platform or photo editing software.
It might seem like a loooong list, but it’s meant to! The idea here is to have every single task of your workflow on a Google doc (or a piece of paper if you work that way!) so you can see exactly where you can make improvements.
Cross-check tasks to see if you are doubling up anywhere
Are you editing photos twice, once for social media and then again for your blog posts? Or are you writing a blog post but then rewriting after doing some more SEO research?
You want to avoid switching back and forth between tasks, it’s much more efficient to do photos > writing > promoting rather than to interrupt each step by having the fix something from the step before.

Batch tasks that use the same software/tools
I prefer to write the blog first, then upload the photos, then write all the photo alt texts, and then add all the links at once. I find it much quicker to be adding links (especially affiliate links) at one time once the blog is written, rather than searching for links when I’m in the middle of writing.
You might want to batch tasks like Pinterest pin creation, social sharing, backing up your photos etc.
Write your blog workflow somewhere you can track it
This one’s important! Write down your blog workflow somewhere that’s easy to access and easy to track your progress.
I have mine set out in Airtable, which is the project management software I use. On here I’ve got a spreadsheet with my entire blog workflow on the first column with tickboxes in the rest, so I can track exactly what stage I’m at in the workflow for various blogs.

Do the same for other creative processes
I actually have a workflow spreadsheet for my photography and my partnerships too. This way I can see at a glance exactly what stage I’m at in terms of editing photos, writing blogs and fulfilling partnership commitments for every trip I do, which means I never have to be stressed about forgetting something or skipping a step!
Setting up a creative workflow can take a bit of time to begin with but the benefits are undeniable. By following a pattern and tracking your progress on tasks, you’re able to get more done, quicker, with less stress. The dream!
Tools and gadgets to support your blog workflow
There are some handy gadgets and online tools that you can use to maximise your time and effort that you’re spending on your blog.
A decent computer
Baby boomers and elderly tourists might think tablets are the future, but I’m a laptop girl myself. A tablet is ideal for Netflix and… well, that’s about it. I need a proper screen, a keyboard and decent storage to keep on top of my blog and content creation. A good laptop is one of the most important blogging or digital nomad essentials!
My laptop is the ultra-lightweight 13.3″ HP Spectre x360, which is so ideal for travelling, and as an added bonus it’s a 2-in-1 that I can use as a tablet if I want to binge-watch some shows or read a book. It’s more than powerful enough to edit photos, the battery life is great, and best of all it it less than 1.3kgs so it fits easily into my camera backpack and won’t give me horrendous back problems down the line.
And if you’re using a laptop then also look into getting a laptop stand like this Nexstand. It’ll minimise strain on your back and neck and keep you at your most productive.
A wireless keyboard and mouse
Laptop touchpads are a nightmare to use all day every day, and laptop keyboards are often at a slightly awkward angle which can cause strain to your wrists and hands.
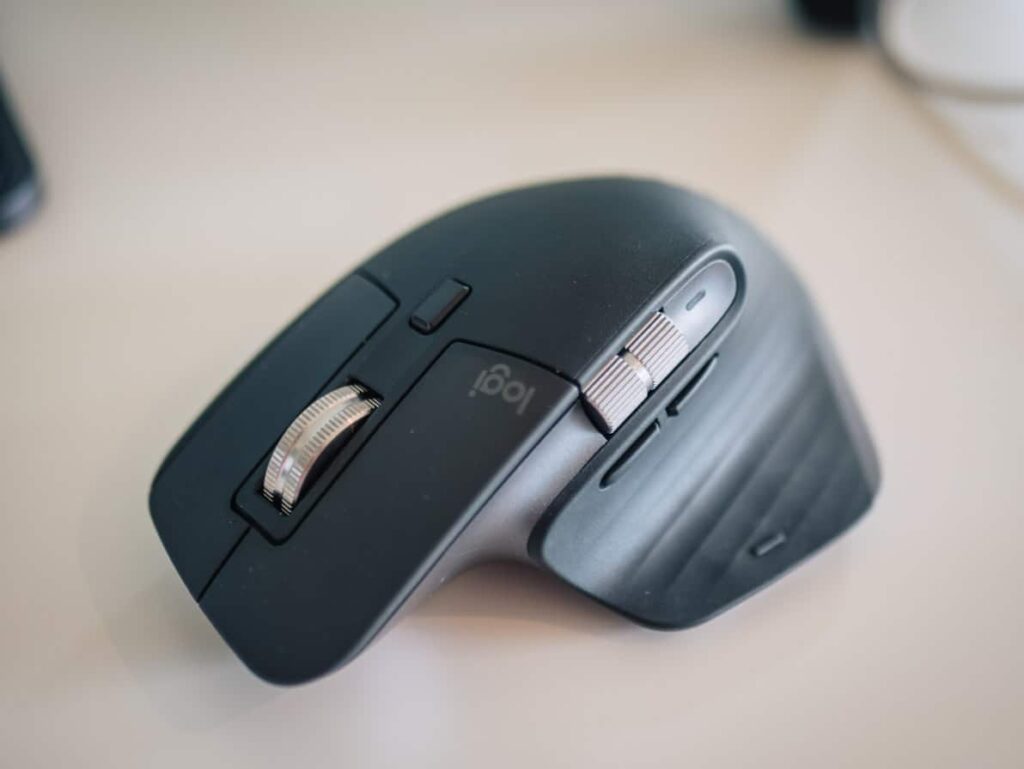
I’ve got the MX Keys keyboard and MX Master 3 mouse from Logitech’s epic MX series, designed for creatives and engineered for coders. They’re USB-C charged so battery lasts aaaages, the mouse is designed to fit your hand perfectly and the keys are smooth and satisfying.
The MX Master 3 is probably my favourite productivity tool right now, it’s got two scroll wheels and six buttons which are completely customisable for different programmes. That means on Google Chrome I can set the buttons to go back or go forward, refresh or switch tabs, then in Lightroom they can change brush size, copy and paste settings and more. It’s absolutely brilliant and has literally saved me hours of blogging time.

Portable hard drives
If you’re working with photos, you’ll need a secure back up system. Ideally this means an online back up and at least two external back ups.
I prefer the LaCie rugged hard drives because they’re sturdy and can handle being shoved into the bottom of my carry on bag, but I’ve also had good experienced with Seagate and WD Elements.
A physical diary or workbook
Some people prefer actual paper notebooks over online tools, or like to mix the two.
I use online tools to track big projects and my detailed to-do list, but I still use an actual diary for daily to-dos, setting goals and monthly check ins. This is the goal-setting diary I have.
A project management tool
If you’re serious about your content creation or blog workflow, it’s definitely worth setting up a free account with a project management platform to track your tasks. Once again, I’ve tested loads out so I can share my personal experience with the different options.
Airtable is my go-to project management tool. It’s like Excel or Google Sheets on steroids, with loads of templates to choose from and different views for your projects. I use a free Airtable account for loads of different projects and tasks, like my blog workflow, photography workflow, travel plans and a gigantic bucket list of hotels, restaurants and activities I want to do on my travels. Told you I’m a nerd…
I’m also familiar with Monday.com, Asana, Trello and Todoist either through my blog or previous job. Monday.com and Asana are both great for project management if you’re working with a team, and Trello and Todoist are more like to do lists with some fancy features.

A note-taking system
Does anyone else feel bogged down with the sheer amount of information you try and keep inside your brain? I felt this way for years – between a busy full-time job, travelling almost every weekend and trying to grow my blog, I was exhausted trying to stay on top of each aspect of my life.
Enter Evernote!
Evernote is a free online note-taking tool that you can use to hold all that info you’re currently trying to squeeze into your head. I use Evernote to store important links, contact details, my yearly goals, notes and minutes from meetings and conferences, summaries of books I’ve read, ideas for future blog posts and more.
Blog resources
There are a bunch of different blog resources I’ve mentioned here that could save you time in the long run.
- Keysearch – an SEO keyword research tool from $17 per month (plus get 20% off with the promocode KSDISC)
- Tailwind – a Pinterest scheduler, an absolute must-have for bloggers (you’ll get a free month of Tailwind Plus when you sign up here)
- Adobe Lightroom – for categorising and editing photos
- Google Photos – an app to back up your photos
- WordPress – the platform I use to build this blog
- FastComet – the host this blog runs off
I hope this blog workflow guide has helped you to optimise the time and effort you’re spending on your blog! Blogging is a hard slog and it can be tough to stay consistent but with a workflow to follow each time you create a new post, you’ll find it much easier and quicker. Let me know in the comments if you have any questions!
Like this blog? Pin it!


Hi, Kia! Your workflow is really nice and looks efficient.
Good article. Looks really efficient. Thank you for sharing
Love the workflow and the tools you have recommended. Thank you !
Thanks! You shared good content about SEO. I am impressed with you for the selection of a new and unique topic and also a well-written article on it.